MAGPIE'S MUMBLINGS
Monday, August 31, 2020
and....I digress.....again.....
Friday, August 28, 2020
Another beginning and a little tutorial
I've made several of these that will be added to the Christmas box and thought maybe some of you might like making them as well. So....a mini tutorial....
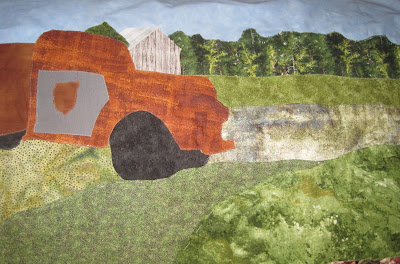
And...another landscape begins. This is the photo I'm using for inspiration...
and used with his kind permission
It seems like Blog-grrr is doing a new 'thing' and has
changed the way links are done. Hopefully it will
be okay on your end but don't be surprised if you
have to do a two-step process to get to the links.
Hopefully it's just a hiccup and they'll fix it soon!
Today's quote..."Better an oops than a what if"
Wednesday, August 26, 2020
We've survived - barely....and a recipe
I know many of you are dealing with an over-abundance of zucchini right now so I thought I'd share one of our favourite recipes.
Monday, August 24, 2020
Additions for Christmas box
Over the weekend I finished making the jewelry holders I wanted to add to the Christmas box (which, I might add, is woefully lacking in items!). Now the search is on to find a nice necklace or bracelet to include and that will make five completed gifts.
The pattern, in case you missed it, is in my previous post.
And finally here's the quote for today....
Friday, August 21, 2020
Jewelry Roll Tutorial
Here's the tutorial for the jewelry holder if you'd like to make one (or several!) for yourself or to use as gifts. If you do make one, please let me know if any of the directions are not clear.
MAGPIE's JEWELRY HOLDER
SUPPLIES:
-
Fabric for outer cover and inner lining,
9”x18”
-
Fabric for interior pockets – assorted
sizes
-
9” (minimum) zipper
-
Lightweight iron-on interfacing
-
Quilt batting, 9”x18”
-
2 medium or large dome fasteners
-
Plastic canvas, 1”x7”
-
2 buttons, optional
-
Ribbon, for ties - approx. 50"
-
Bias tape (purchased, or make your own)
CUTTING:
-
1 piece each 9x18” of the outer cover,
inner lining and quilt bat
-
1 piece 9x7” interior fabric (for lower
pocket)
-
1 piece 9x8” interior fabric (for middle
pocket)
-
2 pieces 8 ½” x 7” interior fabric (for pocket flaps)
-
1 piece 9x8” interior fabric (for lower
zippered pocket)
-
1 piece 9x9” interior fabric (for upper
zippered pocket)
-
2 pieces 1” x 24” exterior fabric (for
ties)
-
BIAS TAPE – long enough to go around
entire outside edge of holder – you may used purchased tape or make your own by
cutting strips of fabric 1 ½” wide by the length required
ASSEMBLY (NOTE: ¼” seam
allowances unless otherwise noted)
LOWER POCKET
1.
Fold 9x7” interior lower pocket fabric wrong
sides together so measures 9 x 3 ½”.
Press fold. Cut piece of iron on
interfacing 9x3 ½” and apply to one half.
Topstitch along folded edge leaving remaining three sides open. Lightly mark pocket stitching lines 3” inside
each edge to create 3 pockets.
MIDDLE
POCKET
1. Fold 9x8” piece of interior middle pocket
fabric in half right sides together to
measure 9x4”. Apply interfacing cut 9x4”
to one half. Stitch long edge, leaving
sides open. Turn and press. Topstitch folded edge. Lightly mark pocket stitching line 4 ½” from
edge.
FLAPS
(make 2). Fold 8 ½ x 7” piece of
interior fabric right sides together so
measures 8 ½ x 3 ½”. Apply 8 ½”x3 ½” interfacing to one half. Round the outer two corners and stitch,
leaving an opening for turning. Turn
& press. Topstitch all but folded
edge.
ZIPPERED
POCKET
1. Fold
9x8” piece of interior lower zip pocket fabric right sides together. Press fold. Apply 9”x4” interfacing to one
half. Stitch long edge, turn and press.
2. Fold
9x9” piece of interior upper zip pocket fabric wrong sides together. Press fold and apply 9 x 4 ½”interfacing to one half.
3. Apply
zipper to the folded edges of each pocket piece by topstitching. Trim extra zipper length as needed (careful –
don’t use your good scissors!)
EARRING
HOLDER
1. Cut
plastic canvas 1x7” making sure edges are as smooth as possible.
2. Cut
2 pieces of interior fabric 3 1/2"x2”.
Fold in one long edge ½ “ and press.
Fold right sides together and stitch raw edges with ½” seam allowance. Clip corners.
Turn & press.
3. Insert
ends of plastic canvas and stitch in place.
4. Center button on fabric end and stitch in place. Add dome fastener to back. Repeat for other fabric end.
FINAL ASSEMBLY
1.
Sandwich exterior fabric WRONG side up,
batting, and lining fabric RIGHT side up.
2.
Align lower pocket and pin in place
3.
Align middle pocket with lower edge 2 ½”
above the top edge of the lower pocket and using coordinating thread topstitch
in place along lower edge.
4.
Using coordinating thread stitch pocket
lines through all layers.
5.
Align pocket flap ¾” above lower pocket
and stitch along top edge. Repeat with other flap and stitch above the middle pocket.
6.
Center earring holder between lower
pocket flap and the middle pocket and apply remaining half of the dome
fasteners.
7.
Align stitched edge of zipper pocket
approximately ¾” above middle pocket flap and stitch along bottom edge.
8.
Trim off any excess fabric and batting
along top edge. Measure and mark 1 ½”
from top corners in both directions.
Join marks and trim (or you may round edges if you prefer).
9.
Cut two pieces of ribbon for ties – one 28”
long and the other 20” long. Center ties with ties lying towards the body of
the holder
along
top edge and baste in place.
10.Apply bias tape to outside edge by
machine, fold over raw edge, and hand stitch in place. NOTE: If making your own bias tape, cut
fabric 1 ½” wide and 2” longer than outside measurement of the holder. Fold one edge in 3/8” and press. Stitch around outside of holder, fold over
and hand stitch to finish.
Today's quote..."Don't think outside the box, think of what you can do WITH the box"
Wednesday, August 19, 2020
A holder for jewels?
I've been spending more hours than I care to admit monkeying round with creating a pattern/tutorial for making this jewelry holder.....
It's hard to see in the photo below but there are three pocket sections, one zippered and the other two covered with flaps. There's a removable earring holder as well.
This one will be gifted at Christmas to the same friend who will be receiving the brush roll holder for her birthday next month. If I manage to get the pattern written clearly enough I will post it here for anyone who also might like to make them. I plan to include a piece of costume jewelry with these.
Today's quote..."If you find something that makes you giggle, smile or laugh....buy it or marry it!"
Monday, August 17, 2020
How about a recipe for a change?
Over the weekend Resident Chef made freezer pickles because we had an abundance of cucumbers appear on our doorstep. They're really good and easy to make so thought perhaps you might like the recipe in case you'd like to make some too.
Not a great photo, but you get the idea. The Resident Chef will sometimes drain a container of these and grind up the veggies to make relish.
FREEZER PICKLES
10 medium cucumbers, thinly sliced
3 medium onions, thinly sliced
1 large green or red pepper, chopped
3 Tablespoons salt
2 c. white sugar
1 c. white vinegar
1 Tablespoon celery seed
Combine cucumbers, onions, green pepper and 2 tablespoons salt. Cover with crushed ice and mix well. Refrigerate 8 hours. Drain, rinse and drain again.
In a large saucepan combine sugar, vinegar, celery seed and remaining salt. Bring to a boil and cook and stir for 1 minute. Spoon over vegetables. Pour into jars, leaving 1/2" head space. Cool. Top with lids and freeze.
Today's quote is from C.S. Lewis..."There are far, far better things ahead than any we leave behind"
Friday, August 14, 2020
The chaos of creativity? Or just a downright mess?
It seems I've gotten myself into a bit of chaos in my sewing studio. In one corner we have this....
and in another corner there's this...
and then there's this....
and then there's this.....
But in the kitchen, Resident Chef is calmly creating good edibles with these...
And, instead of a quote today....
Wednesday, August 12, 2020
Something a little different
Remember that new fabric stash enhancement from a week or so ago? Part of the plan for some of it was to make this for a birthday gift...
It's a bit hard to tell in this photo but there's a flap that covers up the brushes and helps to hold them in place...theoretically anyway! The inside is lined with that waxed fabric I bought. First time I've used it so we'll see how well it wears. Hopefully it will be somewhat wipeable should the need arise. The pattern is 'Roll-Up Organizer' by Tim Holtz for Coats and can be found HERE.
And this mess is me trying to come up with a prototype design for a new project. Certainly gives me a great appreciation for pattern designers because it's definitely a challenge!
Stay tuned to see if it ends up being a success or another of those things destined for the 'file' beneath my desk!
Today the quote is for those of you who garden and is from Ralph Waldo Emerson..."What is a weed? A plant whose virtues have never been discovered"
Monday, August 10, 2020
A finish!
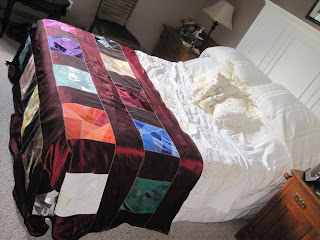
Here is a finish of a different sort! You're used to seeing my landscapes but how about the finished crazy quilt for a change? As you can see from the photo it just covers the foot of our bed which is rather necessary because our bed is up on risers to allow for storage underneath. That means that pretty much all purchased bedspreads don't end up being long enough and leads to the need for something a little extra.
For some reason Blog-grrr is pitching a hissy fit and refusing to allow me to align photos in the middle. Oh well.
This new quilt (twin-sized) will be part of our winter ensemble on our bed.
Here's a closeup of one of the blocks so you can see the machine stitching....
The fabric I used around the blocks is actually meant for curtains and is something I found at a thrift store at one time. I have LOTS of it so it was nice to use some of it on this project.
And....look what arrived in my sewing room doorway over the weekend? Sourdough sticky buns!
Today's quote from Abraham Lincoln..."In the end, it's not the years in your life that count, it's the life in your years"


